Restoring My Family’s Cast Iron Skillets: A Full How-To Guide (+ Cornbread Recipe)
- Kate Carr

- Jul 5, 2025
- 5 min read
Updated: May 5
When Kevin and I were recently visiting my parents, we found ourselves cooking steak sous vide-style, and reaching for a good cast-iron skillet to finish it off. Only problem, none of the pans were quite right. Years of neglect (and love) had left my mom’s old skillets in less-than-glorious shape. So I brought home all six, each one different in shape and size, including the sweetest little corn mold pan for cornbread. They were dusty, rusted, and covered in la few ayers of old, flaking oil. But with a little time and attention, I gave them the revival they deserved.
This is exactly how I restored my family's cast iron skillets, and how you can, too.

What I Brought Home
1 corn-shaped cornbread mold
1 small round (approx. 6")
1 flat griddle-style skillet with a tiny lip (9")
1 deep 8"
1 shallow 8"
1 standard 10" skillet
Each had a different level of buildup or rust, but with patience and the right process, they’re now gleaming, seasoned, and ready to be passed down again one day.

Step-by-Step Restoring Cast Iron Skillets Guide
Step 1: Choose Your Prep Method – Vinegar Bath or Oil + Salt Bake
Depending on the condition of your pans, you can start with either a vinegar soak or a low-temp oil and salt bake. Here’s how to choose:
If your pan has a lot of rust or flaky old seasoning, especially on the exterior, go with the vinegar bath first.
If your pan is dusty or lightly grimy with no major rust, the oil and salt bake works beautifully.
Option 1: The Vinegar Bath Trick (Great for Rusty or Built-Up Pans)
Mix 50/50 white vinegar + warm water
Use a plastic tub or bucket to lay your pan sideways—you don’t have to fully submerge it!
Just tilt the pan so the vinegar line hits the trouble area
Soak for 15–30 minutes, max 1 hour
Scrub immediately afterward with foil or steel wool
Rinse and dry completely (I used low stovetop heat to evaporate any moisture)
One of my pans has a perfectly smooth line where it sat in the vinegar and a slightly rough surface just above it—proof that this trick works.
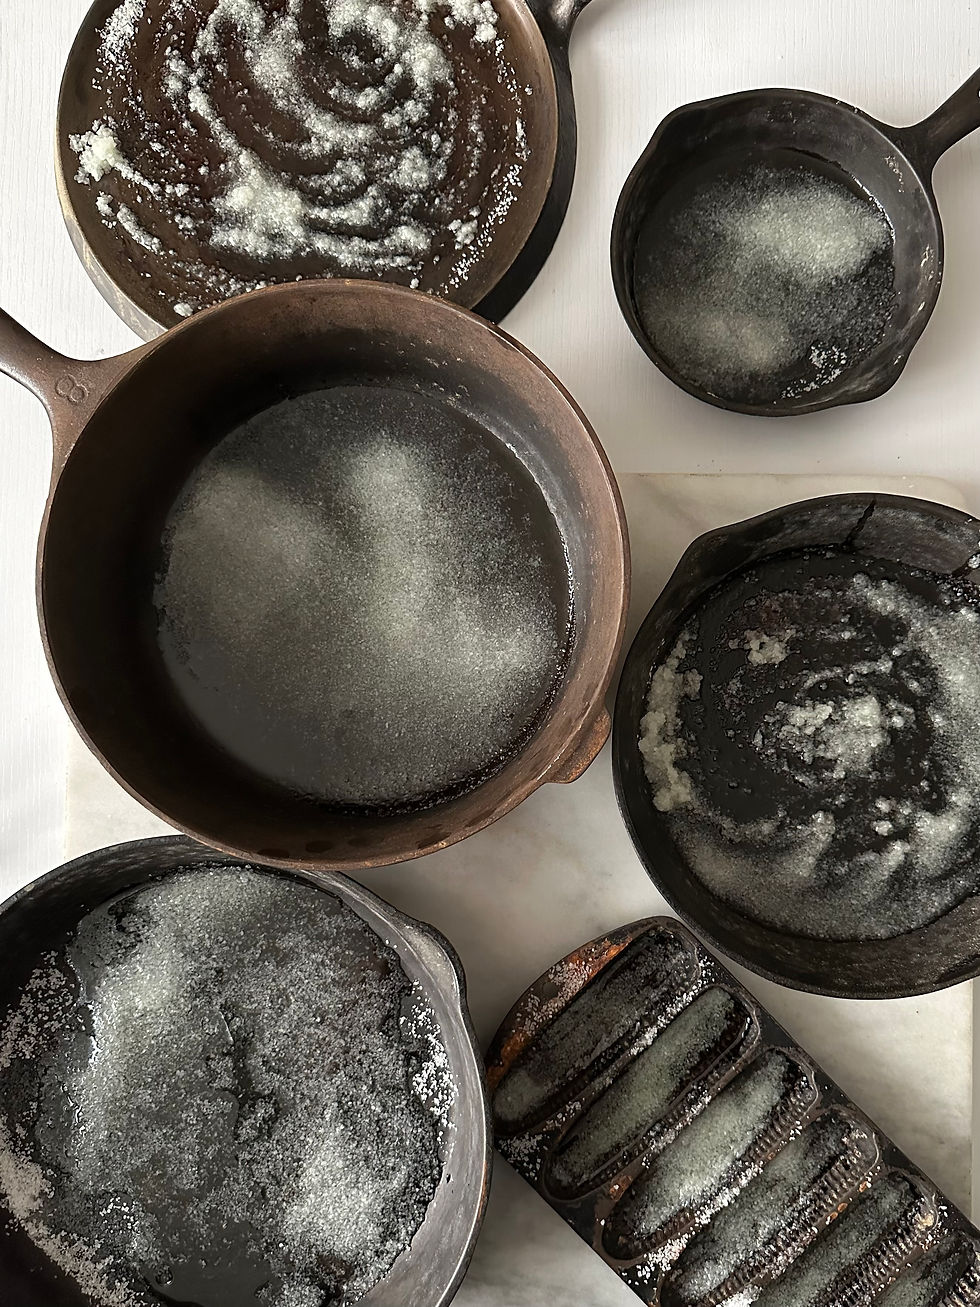
Option 2: The Oil + Salt Low-Temp Bake (Great for Dusty or Lightly Dirty Pans)
Preheat oven to 250°F
Pour 1–2 tablespoons coarse salt into each pan
Add 1–2 teaspoons grapeseed oil
Spread evenly across the cooking surface
Bake right-side up for 30 minutes
Let cool enough to handle
Scrub with crumpled aluminum foil
Rinse and dry completely


Step 2: Season the Right Way
This is where the cast iron gets that gorgeous matte sheen.
Preheat oven to 450°F
Rub a very thin layer of grapeseed oil all over the pan—inside, outside, handle, bottom
Wipe it nearly dry with a clean towel or paper towel
Place upside down on the middle rack
Place foil or a baking sheet on the rack below to catch drips
Bake for 1 hour
Let cool in the oven with the door closed for 30–60 minutes
Optional: After cooling, I added one last ultra-thin wipe of grapeseed oil and baked for another 20 minutes to protect the finish.

Cast Iron Cornbread (Crispy Edges, Moist Center)
I grew up in a house where cornbread leaned dry and not too sweet. My parents were both raised in Louisiana, and that style was their go-to. It was meant to be doused in honey or strong enough to pair with savory dishes like okra and stewed tomatoes (another not-so-favorite of mine).
I never loved it, but I also don’t love the other extreme: the super-rich, ultra-moist, sweet-as-cake kind. This recipe lands right in the middle. It’s my perfect balance. Lightly sweet, moist inside, and just crispy enough on the outside, especially when baked in well-seasoned cast iron.

Ingredients (Full Batch)
1½ tablespoons butter (for greasing the pan)
1⅓ cups all-purpose flour
⅔ cup yellow cornmeal
⅔ cup sugar
1 tablespoon baking powder
¾ teaspoon baking soda
¼ teaspoon salt
4 tablespoons melted butter
¼ cup neutral oil (grapeseed or canola)
1¼ cups milk or buttermilk
2 large eggs
Instructions
Preheat oven to 375°F. Place your 10" cast iron skillet or 9x9 baking dish in the oven with the 1½ tablespoons butter.
In a large bowl, whisk together flour, cornmeal, sugar, baking powder, baking soda, and salt.
In a second bowl, whisk melted butter, oil, milk, and eggs.
Pour wet into dry ingredients and stir gently to combine (don’t overmix).
Remove the hot pan from the oven, swirl the melted butter to coat, then pour in the batter.
Bake for 35–40 minutes, or until golden and a toothpick inserted in the center comes out clean.
Cool slightly before slicing and serving.

Fun fact: my mom never actually used the corn-shaped mold pan—it mostly just sat on display in the kitchen because it looked charming. She wasn’t one to spend time restoring cast iron or fussing over vintage pieces, and honestly, that little mold wouldn’t have fed our crew anyway. It only makes seven pieces, and there were seven of us growing up—five of them men! So unless you were fast, you weren’t getting seconds.
Cornbread Mold Variation (For 6–7 Corn-Shaped Cavities)
Adjusted Ingredients
¾ cup + 2 tablespoons all-purpose flour
⅓ cup yellow cornmeal
⅓ cup sugar
1½ teaspoons baking powder
⅓ teaspoon baking soda
Pinch of salt
2 tablespoons melted butter
2 tablespoons neutral oil
⅔ cup milk or buttermilk
1 egg
¾ tablespoon butter (for greasing each cavity)
Instructions
Preheat oven to 375°F. Place the corn mold pan in the oven with a small dab of butter in each cavity.
Mix dry ingredients in one bowl and wet ingredients in another, then gently combine.
Remove the hot mold, swirl butter to coat, and spoon batter into each cavity (fill about ¾ full).
Bake for 20–25 minutes or until golden brown.
Let cool slightly and gently loosen with a butter knife.
*If your mold has more cavities or you have extra batter, pour the rest into a muffin tin or ramekin and bake alongside.

Restoring these pans wasn’t just about cookware. It was about legacy. About memory. About making something usable and beautiful again. Now, every time we sear a steak or bake a skillet dessert, I know a piece of my mom’s kitchen lives on with us.
A Little About Us
My husband Kevin and I share a deep love of food, connection, and the magic that can happen around a table. We created Date Nite to bring more intention, fun, and flavor to your evenings at home, whether you're newly dating, married for years, or simply craving a little reset in your weekly rhythm.
If you enjoyed this post, we’d love to invite you into our world of delicious meals, creative menus, and meaningful moments.
Awesome content!